

🛠️ Upgrade a Basic Type volume of a single disk ⛁ to a bigger one on multi-bays Synology NAS.

Updated on October 1, 2026
6 min read
A Basic volume lives on one disk and has nowhere to grow into, so the only way to enlarge it is to put it on a bigger disk. This walks through cloning the single disk onto a bigger disk inside a multi-bay Synology NAS, then repartitioning so the volume actually uses the extra space. Both disks have to be in the unit at the same time, which is why a multi-bay model is required.
The proposal is from a post of Synology Community english version. ( Thank Simon56~ )
I made a testing to see if clone then modified something could do some help. Luckily it could and here is the record.
However, the process is on risk thus it is best to have a backup before proceed.
For example, if the clone direction is wrong the data on the original disk is gone. Thus, please ask if you have any doubt.
And this method is ONLY suitable for:
- Multi-bays Synology NAS
- Volume type MUST be【Basic】. Not for SHR Volume of single disk.
This testing is done by DSM7.2 and this may change in the future update.
STEP0. Stop all apps writing to the volume on the small disk. #
Before cloning disks, we need to STOP apps ( SMB accessing, Surveillance Station, Virtual Machine Manager…etc ) writing data to the volume related to the source disk.
If data keeps on writing the volume of the smaller disk, the cloned disk clone will contain inconsistent data.
In this testing, 1TB disk is used to create a Basic Volume 2:
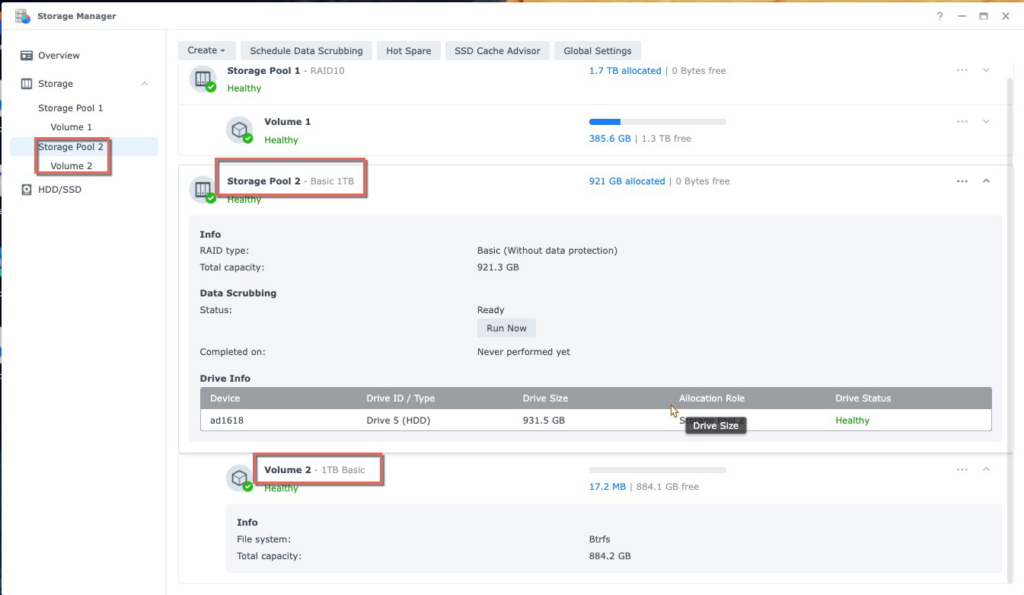
We are going to upgrade this 1TB volume 2 to bigger one by a 8TB disk.
STEP1. Know the device id under Synology terminal mode. #
To use command to control the disk, we need to know the disk id under Linux mode.
For example here, a DS1618+ has 6 disk slots:
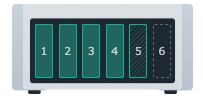
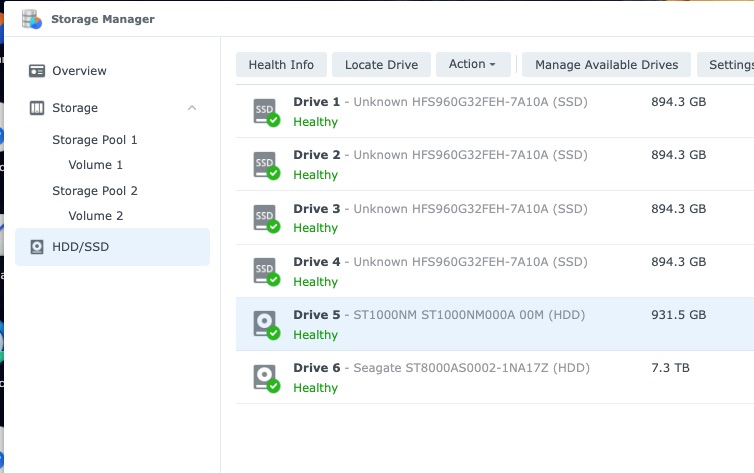
Each disk device id is:
- Drive 1 → /dev/sda
- Drive 2 → /dev/sdb
- Drive 3 → /dev/sdc
- Drive 4 → /dev/sdd
- Drive 5 → /dev/sde
- Drive 6 → /dev/sdf
Similar logic could be applied to other Synology NAS model.
STEP2. Clone the source disk to the bigger disk via Linux command dd #
dd is a basic Linux command used here to clone the sector from 1TB disk to 8TB disk.
We want to clone the smaller 1TB disk5 ( /dev/sde ) to 8TB disk6 ( /dev/sdf ).
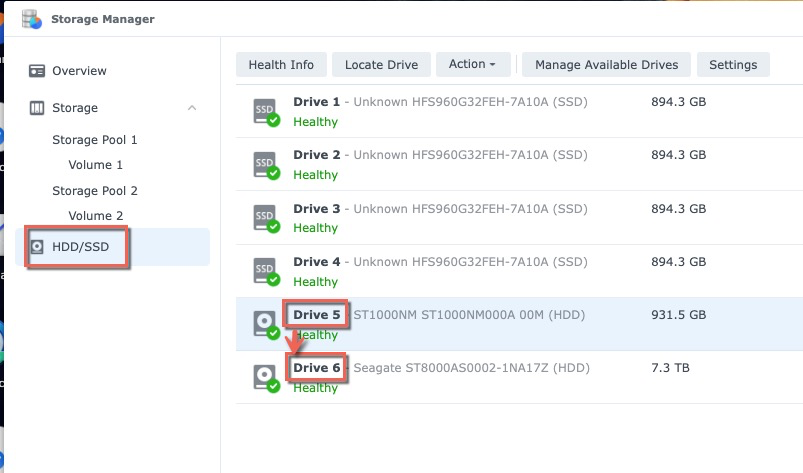
Login Synology via SSH and Syntax of cloning the whole disk is:
adair@one1618p:~$ sudo -i
Password:
root@one1618p:~# dd if=/dev/sde of=/dev/sdf bs=64k- if = input file. Here is the source disk, disk5: /dev/sde.
- of=output file. It is 8TB disk6, the target bigger disk: /dev/sdf.
- bs is block size. Setting to 64k could get best clone speed in Synology NAS.
Observe the clone speed on Resource Monitor
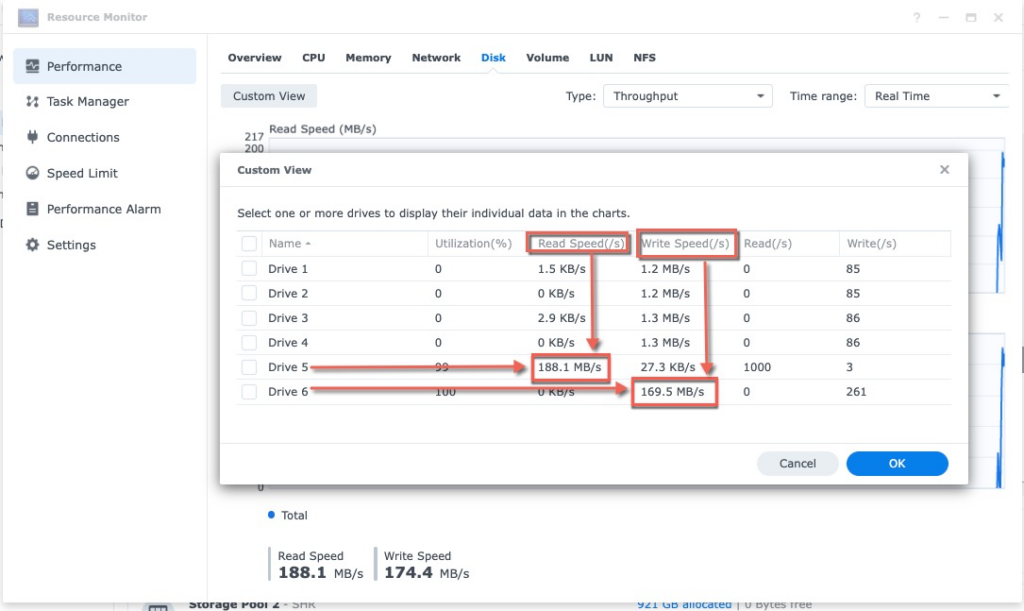
The average writing speed could be treated about 150MB/s.
Once the cloning press is done, ssh terminal will be like this:
root@one1618plus:~# 15261915+1 records in
15261915+1 records out
1000204886016 bytes (1.0 TB, 932 GiB) copied, 6887.13 s, 145 MB/s
Cloning 1TB disk to other device means to read 1TB data.
This will cost about 1.9hrs.
STEP3. Repartition the bigger disk so it reports its full size #
The command dd clones the info of every sector of the source disk to target disk, including the partition table.
The target disk partition table has old resource disk size definition. To correct this, we will need to repartition the bigger target disk for its real size.
There are many version of Synology disk partition layout after years of development. Thus Synology has a command called synopartition to handle different layout.
There are 2 parts for this step.
Part1. Know the partition layout version of old smaller disk #
This part 1 is to examine the old smaller disk5, 1TB, /dev/sde. Here is how to examine the version for disk5, /dev/sde.
It is version 9 and its index number is 15.
root@one1618p:~# synopartition --check /dev/sde
/dev/sde: partition layout is version 9, list index is 15.
root@one1618p:~# synopartition --list
Index  Version  1-Bay  Size of Root/Swap/Reserved Partition
   1.        1    YES    273042/  787185/ 273042 sectors (  133/  384/ 133 MB)
   2.        2    YES   4980087/ 1044225/ 257040 sectors ( 2431/  509/ 125 MB)
   3.        3    YES    530082/  787185/  16002 sectors (  258/  384/   7 MB)
   4.        5    YES    722862/  594405/  16002 sectors (  352/  290/   7 MB)
   5.        6    YES   4980087/ 4192965/ 257040 sectors ( 2431/ 2047/ 125 MB)
   6.        7    YES   4980480/ 4194304/ 262144 sectors ( 2431/ 2048/ 128 MB)
   7.        8    YES   4980480/ 4194304/ 260352 sectors ( 2431/ 2048/ 127 MB)
   8.        9    YES  16777216/ 4194304/ 262144 sectors ( 8192/ 2048/ 128 MB)
  10.        1     NO   1574307/  787185/ 273105 sectors (  768/  384/ 133 MB)
  11.        2     NO   4980087/ 1044225/ 257040 sectors ( 2431/  509/ 125 MB)
  12.        6     NO   4980087/ 4192965/ 257040 sectors ( 2431/ 2047/ 125 MB)
  13.        7     NO   4980480/ 4194304/ 262144 sectors ( 2431/ 2048/ 128 MB)
  14.        8     NO   4980480/ 4194304/ 260352 sectors ( 2431/ 2048/ 127 MB)
  15.        9     NO  16777216/ 4194304/ 262144 sectors ( 8192/ 2048/ 128 MB)
  19.      100    YES  41943040/ 4194304/      0 sectors (20480/ 2048/   0 MB)
  20.      100     NO  41943040/ 4194304/      0 sectors (20480/ 2048/   0 MB)
Part2. Repartition the bigger new disk #
Part2 is to partition to the bigger disk, here it is 8TB disk6, /dev/sdf.
And we want to partition it to be verion 9, index 15. Syntax is:
root@one1618p:~# synopartition --part /dev/sdf 15

        Device   Sectors (Version9: SupportRaid)
     /dev/sdf1  16777216 (8192 MB)
     /dev/sdf2   4194304 (2048 MB)
Reserved size:    262144 ( 128 MB)
Primary data partition will be created.

WARNING: This action will erase all data on '/dev/sdf' and repart it, are you sure to continue? [y/N] y
Cleaning all partitions...
Creating sys partitions...
Creating primary data partition...
Please remember to mdadm and mkfs new partitions.
It will tell erase all data, but it will not as it does a quick partition only. This does not touch data in the existed volume in this disk.
To check more details about synopartition, you could google it or type ” synopartition –help ” under SSH terminal.
root@ad1618:~# synopartition --help
Copyright (c) 2003-2023 Synology Inc. All rights reserved.

Usage: synopartition (Version )
--help   Show this help.
--list   List the partition layout table.
--check disk_path(eg./dev/sda)
         Check the partition layout version.
--remove disk_path [part_no]
         Remove specific partition of disk. Remove all partitions if not specific.
--part [--force] disk_path index_of_list(1~20) [logical_size_GB ... 0]
         Partition the disk with specific layout.
--scan-syno-part
         Scan all disk partition which matches syno partition layout.
  If you select layout version less than 6, the logical size will be skip.
  Else you can assign max to 11 logical partitions size with unit GB and end with 0.
  If you don't assign logical size parameters, primary data partition will be created instead.

  Please note the index of list may modified in future.
--log disk_path
         Log start offset and size to file for every partition in the disk_path.
STEP4. Reboot Synology NAS with the bigger disk #
Here comes the final progress:
- Power off Synology NAS
- Remove the old, smaller disk ( Now it’s our backup ).
- Power on Synology NAS with the new, bigger disk.
After booting up, the old, smaller size 1TB volume is still there.
There is a “ expand now ” link under Storage Manager > Storage Pool. Just click the link:
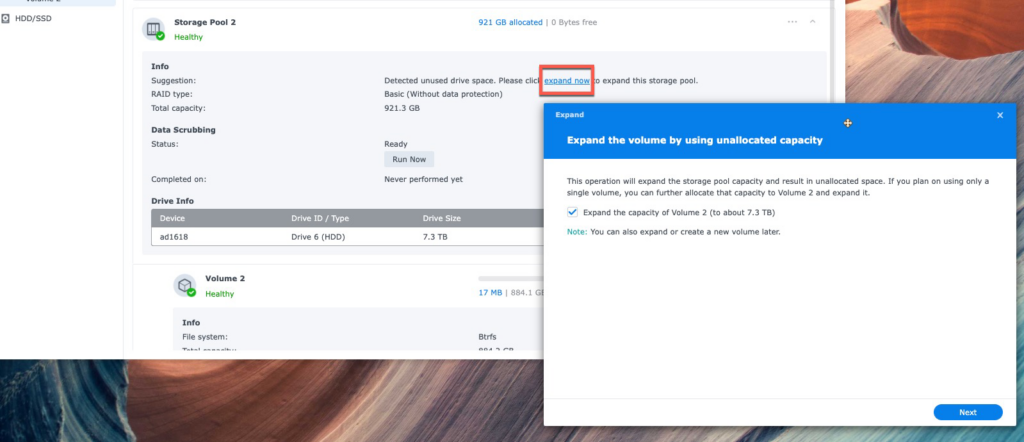
1TB volume 2 will be expanded to 8TB volume2.
The above is all.
From my personal opinion, it is best that Synology directly supports this function on Storage Manager to clone the disk. This feature is useful and convenient. The reasons could be seen in the following posts too:
Upgrading to a Bigger Disk FAQ #
Will I lose data moving a Basic volume to a bigger disk? #
Not with this method. The clone copies the source disk block for block, so the volume and its data arrive intact. Take a backup first anyway, because a clone that goes wrong halfway leaves you with two unusable disks.
Why can a Basic volume not just be expanded in Storage Manager? #
A Basic volume sits on one disk with no spare room to grow into. Expanding in place needs either a second disk to convert to SHR or RAID, or a bigger disk with the volume moved onto it, which is what this guide does.
Do both disks have to be in the NAS at the same time? #
Yes for the clone step. That is why this only works on a multi-bay unit: the source and the bigger disk both need to be visible to the same running DSM.
Why does the partition need to be edited after cloning? #
The clone reproduces the original partition table as well as the data, so the new disk reports the old smaller size. Repartitioning tells the system to use the extra space that the bigger disk actually has.
Is this supported by Synology? #
No. It uses the DSM shell and standard Linux tools, which is outside what Synology support will help with. Use it when the alternative is rebuilding the volume from backup, and keep that backup until the result is verified.

On Sale
Synology Surveillance Station License 8-Camera #
Original price was: NT$19,619.NT$17,393Current price is: NT$17,393.
On Sale
Virtual Machine Manager Pro (VMM Pro) License #
NT$6,553 NT$35,274Price range: NT$6,553 through NT$35,274
On Sale
Synology Surveillance Station License 4-Camera #
Original price was: NT$9,798.NT$8,717Current price is: NT$8,717.
On Sale
Synology Surveillance Station License 1-Camera #
Original price was: NT$2,444.NT$2,200Current price is: NT$2,200.
On Sale
Synology MailPlus License 5-User #
Original price was: NT$9,808.NT$8,562Current price is: NT$8,562.
On Sale
Synology MailPlus License 20-User #
Original price was: NT$40,293.NT$33,222Current price is: NT$33,222.
On Sale
Virtual DSM (VDSM) License 1-Instance #
Original price was: NT$6,017.NT$5,144Current price is: NT$5,144.
Have question? Just ask SynoPower Club.